Article
0 comment

Update on the Office 356 icon font and SharePoint 2016

Office 365 Icon Font

Microsoft has recently “removed” or at least don’t maintain the Office 365 icon font on their CDN. The location of the icon font has recently fundamentally changed.


A possible reasons

The font is still available on CDN but shouldn’t be used anymore form my point of view. The problem is that the url to the font files always had a version number included.
With every upgrade of Office365 this address has changed and your custom code have to be adapted too.

@font-face {
    font-family: "SPO365Icons";
    src: url("http://cdn.sharepointonline.com/15325/_layouts/15/fonts/Office365Icons.eot");
    src: url("http://cdn.sharepointonline.com/15325/_layouts/15/fonts/Office365Icons.eot?#iefix") format("embedded-opentype"), 
         url("http://cdn.sharepointonline.com/15325/_layouts/15/fonts/Office365Icons.woff") format("woff"), 
         url("http://cdn.sharepointonline.com/15325/_layouts/15/fonts/Office365Icons.ttf") format("truetype"), 
         url("http://cdn.sharepointonline.com/15325/_layouts/15/fonts/Office365Icons.svg#web") format("svg");
    font-style: normal;
    font-weight: normal;
}

For my blog post “Office 365 Icon font documentation” and the demo installment on lab.n8d.at I had to adapt the urls form time to time.

Those changing urls hindered the use in custom implementations. The latest version is still available through the CDN link.

The new font location is _layouts

To be honest to change a CDN url from time to time was not really an optimal solution. So for lab.n8d.at I had to change the url at least five times. Nearly every month.
Recently I was a little bit nervous be cause the CDN was now static for at least two month.

Just to be sure, I checked the current location of the fonts files today and recognized that this has fundamentally changed on Office 365.
Now all fonts are located in the folder “_layouts/fonts”. This is new in SharePoint and Office 365. Fair enough to check if this folder is also available in the current SharePoint 2016 version and yes it can be found there as well.

Office 365 icon font location on SharePoint 2016

Office 365 icon font location on SharePoint 2016

Beside there are also some other fonts stored there that I will investigate soon.

Final thought

I really like the fact that SharePoint on Office 365 and SharePoint 2016 will now use the same basis again. While Office 365 in the past has improved much quicker on-premises SharePoint were always a year behind.
Hopefully we will see further improvements on both platforms at the same time. Through all the hybrid scenarios, it has to be this way.
I know to have the same fonts on Office 365 and Sharepoint is just a small improvement but it makes development of custom web parts (jslink, add-in part and angularjs) easier. You can develop them once and use the same the in the same way in both worlds. It currently serves most icons you need and you are able to provide a consistent design across SharePoint.
Article
2 comments

Enhance suite bar for your responsive experience

Over the last year I did more branding projects on Office 365 than on on-premise. Since the first call by Microsoft to avoid modifications of the master page I played around with certain scenarios and patterns to reduce or avoid such modifications.
One common issue is that the suite bar is responsive (everything that resize is responsive) but not well optimized for mobile. Without any enhancements this part of SharePoint shows only half of the content. With some small CSS only modifications the suite bar looks great on nearly any device.
The following blog post use SASS pre-processed CSS the compiled CSS can be found too at the end of this post.

[Read more]

Article
7 comments

How to add viewport meta without editing the master page

If you like to create a responsive user experience it is common practice to add a <meta name=”viewport”> tag to the html. This tag contains instructions to the browser in the matter of viewpoints and zooming and make sure that your web design is scaled properly according to your style definitions. Without this tag SharePoint on an iPhone will look as seen on the screenshot below. Currently SharePoint doesn’t support it by default.

[Read more]

Article

How to use: Table of Content – jQuery Plugin

After I’ve published the revised version of my table of contents script I got many request on “How to use” it. You asked for it and here it is the guide how to embed the script. I won’t provide a full featured step by step guide here. Instead, I will provide a small package of a page layout and a guide how to script embed directly. To make this work you need to have an Enterprise Wiki or Publishing page. The first part covers how to add a page layout containing the table of contents script. The second method shows how to add the script using code embedding. You also need to download the following file TableOfContents-PageLayoutPack that contains all the required files.

[Read more]

Article
0 comment

Tips & Tricks: Add attachments to list items faster

The great thing about SharePoint is that you can accomplish a goal in many ways. In my case the first version was SharePoint 2003 and I’m used to add attachments always from the edit form.
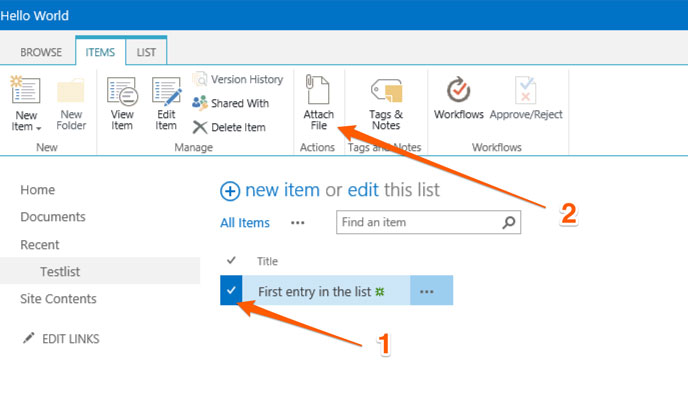
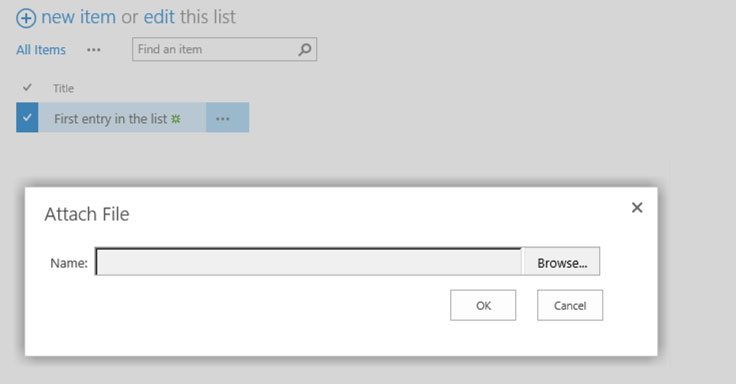
Recently, while I was working on a solution that works with attachments of list items, I accidentally discovered a faster way to add attachments to a list item. This option is hidden in the ribbon and allows to add attachments directly from the list view.

1. Select item 2. Attach file

1. Select item
2. Attach file

First select any item from the list and then the ribbon button. After you clicked the button the upload dialog opens and an attachment can be added to that specific item.

upload attachment

upload attachment

This saves time especially if files need to be added to multiple files. Sadly the upload dialog doesn’t support multiple file upload via drag and drop. This works in SharePoint 2010 as well as in SharePoint 2013

The lesson I learned. Review your personal and trained workflows, how you do something. There is might a better way to do something.


Article
4 comments

Remote form customization: Passing data to a modal dialog – Part 1

Let’s jump right into the topic how it is possible to pass data to a modal dialog. On first sight it looks like a complex task but after you read this article you will get an overview how it works. In this simple scenario I use a HTML Form web part with a text box and a hyperlink. The value then should be passed to the new form dialog of a custom list called “Cars”.

Opening the modal dialog

In general there are two ways to open a modal dialog.  The asynchronous and the synchronous way to open a modal dialog, but here I use the synchronous way to keep the code simple.

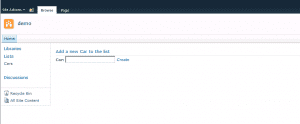
The setup for this scenario is simple. First I created a custom list named “Cars” and this list has nothing more than the default title field. After that I added a new HTML Form Web Part to the landing page of my demo site. Then I added a simple form to the web part. It consists of a textbox with the id “newcar” and a hyperlink with the id “create” to create a new entry. This form also loads JQuery from the CDN and the custom script that is needed to pass the value of the input field to the modal dialog.

html form web part

HTML Form web part that should pass the values to the modal dialog

The code of the form looks like this:

<script src="http://code.jquery.com/jquery-1.9.1.min.js"></script>
<div>
    <b>
    Car:
    </b>
    <input type="text" id="newcar" value="" />
    <a href="/sites/demo/Lists/Cars/NewForm.aspx" id="create">
        Create
    </a>
</div>


First the click event on the hyperlink needs to be registered to open a modal dialog. Then the data from the textbox needs to be passed to the title field of the modal dialog.

var childDialog = null;

$(document).ready(function(){

    // register event handler to open the modal dialog
    $("#create").on("click", OpenNewFormInDialog);

});

var OpenNewFormInDialog = function(e){
    // Disabling the default hyperlink behavior
    e.preventDefault();

    // Get the form url from the link
    var formUrl = $(this).attr("href");

    // Setting the option of the modal dialog   
    var options = {
        title: "New Car",
        url: formUrl
    };

    // Open the new dialog
    SP.UI.ModalDialog.showModalDialog(options);

}

So far so good this all no rocket science but how do we get the data to the form? Therefor a little trick is needed. The function “SP.UI.ModalDialog.get_childDialog()” will return the last loaded modal dialog. The modal dialog object returned by this function has a special property named $c_0. Once the dialog has been loaded it contains the content of the modal dialog. All that needs to be done is to recheck this property during the loading of the dialog. This can be accomplished with a simple recursive call that pauses for 100 milliseconds, in my case, and check the property again. If this is set then the loading has been completed.

...

    // Open the new dialog
    SP.UI.ModalDialog.showModalDialog(options);

    // Get the child dialog
    childDialog = SP.UI.ModalDialog.get_childDialog();

    // Check the loading state
    CheckDialogState();

}

var CheckDialogState = function(){

    // check if dialog is fully loaded
    if (childDialog.$c_0 != undefined || childDialog.$c_0 != null) 
    {
        // get title value from textbox
        var titleValue = $("#newcar").val();

        // load document from modal dialog into a jquery object;
        var dialogContent = $(childDialog.$c_0);

        // find title field in dialog by it's title value
        var titleInputField = dialogContent.find("[title=Title]");

        // setting the title field
        titleInputField.val(titleValue);

    }
    else 
    {
        // Wait for 100ms and then check again
        window.setTimeout("CheckDialogState();", 100);
    }

}
...

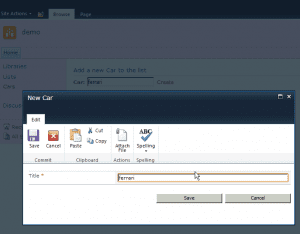
After the content has been loaded all that needs to be done is to parse the property to a JQuery object. Once it is accessible in JQuery the value of the form web part input field can be added to the title field of the new form. The result can be seen in the following screenshot.

modal dialog after the values have been passed

Modal dialog after the values have been passed to the modal dialog

Further user experience enhancement

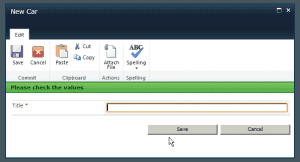
A nice additional feature when data will be passed to a modal dialog is to tell the user to check the values. This can be done using the page status bar for example. The problem here is that the status bar cannot be enabled with the SharePoint function SP.UI.Status.addStatus.

Previously we already loaded the content to a JQuery object, so we can do further manipulation of the output of the modal dialog. SharePoint renders on default a placeholder for that page status with the id “#pageStatusBar”. The code to show the page status looks like this:

...
        // add message to page status bar and toggle the display to be shown
        dialogContent.find("#pageStatusBar").html("<strong>Please check the value</strong>")
        dialogContent.find("#pageStatusBar").toggleClass("s4-status-s2").css("display", "block");

        // resize the modal dialog.
        childDialog.autoSize();
...

At the end I forced the modal dialog to resize itself to avoid possible scrollbars.

Modal dialog with page status

Modal dialog with page status

If you have any suggestions or question please feel free to provide some feedback. As always you can download the html form web part in the link below.

Download the web part: Modal dialog part 1

Please make sure to change the path of the new form

Article
3 comments

Close SharePoint Modal Dialogs with “Esc”-Key press

Whenever a list items will be checked or reviewed in SharePoint a modal dialog come up. This feature of SharePoint 2010 is really helpful from a usability point of view, because the user is able to return to the list where the interaction with the list item has been started by closing the modal dialog. When this will be done a couple of times a day, the user will always have to move the mouse pointer to the close button to close the dialog.

As user learned over the last couple of year, when the user want something to go away that pops out of the current browser window, no matter if it is a modal dialog, image or full screen video the use only have to press the “Esc”-Key to make it go away.

As I mentioned before this is not implemented in SharePoint now, but could be changed with a simple JavaScript and the usage of the Modal Dialog Framework implemented in SharePoint. To add this functionality I created a simple sandbox solution, which has a module and a JavaScript.

First of all the elements.xml contains the following definition:

<?xml version="1.0" encoding="utf-8"?>
xmlns="http://schemas.microsoft.com/sharepoint/">
  <CustomAction
      ScriptSrc="~sitecollection/Style Library/FetchKeyStroke/CloseDialogOnEsc.js"
      Location="ScriptLink"
      Sequence="102"
      ></CustomAction>
  <Module Name="FetchKeyStroke" Url="Style Library">
    <File Path="FetchKeyStroke\CloseDialogOnEsc.js" 
          Url="FetchKeyStroke/CloseDialogOnEsc.js" />
  </Module>
</Elements>

The custom action register a JavaScript on the Master Page. The module definition deploy the JavaScript file the style library, the location for the deployment is URL parameter on the module. The JavaScript file only has few lines of code that capture the ESC-Key press  and close the mos recent dialog. The rest could be found in the following script.

document.onkeypress = function(e) {
    e = window.event || e;

    // Check if ESC-Key is pressed
    if (e.keyCode == 27) {

        // Check if a dialog was recently opened
        var dialog = SP.UI.ModalDialog.get_childDialog();
        if (dialog != null) {
            // Try to close the dialog
            SP.UI.ModalDialog.commonModalDialogClose(SP.UI.DialogResult.cancel,
                "Closed by ESC");
        }
    }
}

Conclusion

With this simple solution I think the usability in SharePoint could be improved a bit and based on SharePoint components like the modal dialog framework. jQuery would be to overweight for this task.

You can download the visual studio solution as well as the sandbox solution.

After the solution deployment a the site collection feature “Close Dialog on Esc-Key press” needs to be activated. In the Style Library the new added JavaScript file needs to be checked in.