In the jQuery days, we had a fake pseudo selector named ‘:header’ that allowed you to select all h1 to h6 headers on a page.
CSS does not support this pseudo selector, but here is what you can write instead. [Read more]
In the jQuery days, we had a fake pseudo selector named ‘:header’ that allowed you to select all h1 to h6 headers on a page.
CSS does not support this pseudo selector, but here is what you can write instead. [Read more]
You are familiar with the JavaScript method like ‘document.getElementByID’. Since HTML5 the Document Object Model has more to offer than return an element by its ID on a document.
Use this.document instead of document
I case of web part development you should forget that the document object inside and HTML exists instead you should request HTML elements differently.
Time is running fast. It is more than a week ago since the first release of the Pattern and Practices open source community generator was released. After one week we already have a new release ready for you that makes it even easier for you to get started your development.

Here are five things that make your life easier.
When you create a new project without any framework, the default web part content in the code will be added through innerHTML.
Technically there is nothing wrong with this approach, but you might run into a problem when you add more content to the web part afterward using the same method. In this case, the previously added content will be overwritten.

To avoid this behavior, you can use jQuery and the ‘append‘ or ‘prepend‘ methods to add your content. It works well but requires an external library.
Instead of using jQuery, there is a native method in the document object model of HTML available.
Today I decided to publish my table of contents script on github. There it will be much easier to handle all the issues and gives the global SharePoint community the possibilities to contribute to my code.
I know from many people that this script is wide spreader throughout various SharePoint installation. I’m looking forward to improve the code in near future. This table of content script has a real long history for me and I published the first version already for SharePoint 2010. It is still one of my most popular posts.

Let me share some statistics with you:
From now on if you have issues or feature request simply publish them on github. If you like to contribute to this project you are also gladly welcome.
After I’ve published the revised version of my table of contents script I got many request on “How to use” it. You asked for it and here it is the guide how to embed the script. I won’t provide a full featured step by step guide here. Instead, I will provide a small package of a page layout and a guide how to script embed directly. To make this work you need to have an Enterprise Wiki or Publishing page. The first part covers how to add a page layout containing the table of contents script. The second method shows how to add the script using code embedding. You also need to download the following file TableOfContents-PageLayoutPack that contains all the required files.
It’s more then two years ago when I first wrote a table of contents script to enhance wiki pages in SharePoint. Time to release a new version and this time it’s a jQuery plugin. This new version will work potentially work with all versions of SharePoint and Office 365. I just have tested it in SharePoint 2013 and Office 365.
Now I also included support to for all levels of headlines (<h1> – <h6>).
This is possible because a found a good old part in the jQuery Documentation

Table Of Contents – Live in Action
Mark Anderson published today an article on his blog concerning an issue that currently exists in Office 365 and is called “Office 365 Update Changes ‘Display Name’ on Required Fields”. In this article he described that the rendering of fields recently have been changed in Office 365. I will take a look what can be done to solve this probably.
The title attribute of list fields have been widely use to customise forms in SharePoint using JavaScript, JQuery or SPServices. I used this attribute sometimes too do address fields by the display name. But somehow I always had a bad feeling about this. Why? Well, the ID attribute of the field is the only real unique identifier in the form. The downside using the ID is that you need to have some information about the field to generate the ID. But I will explain this later.
What the update recently in Office 365 did was to change the rendering of the field. Previously it look like this:
<select id="Region_59566f6f-1c3b-4efb-9b7b-6dbc35fe3b0a_$LookupField" title="Region">
Now it has changed to this:
<select id="Region_59566f6f-1c3b-4efb-9b7b-6dbc35fe3b0a_$LookupField" title="Region Required Field">
As you see now the title has additional parts such as required or field. This means that you haven’t in this attribute the display name of the field alone and you will fail if you query by title.
As mentioned before the ID property is the only one that is unique in the whole page. The ID is formatted in the following form:
Field name + ”_” + Guid of the field + ”_$” + Type of the field.
As seen in the previous section the ID looks like this:
Region_59566f6f-1c3b-4efb-9b7b-6dbc35fe3b0a_$LookupField
So if you like to be absolutely sure and like to generate this ID by yourself you need to do a request to the list and read the fields. The you will be able to find the name by the display name, the id and the type. This will make some lines of code that you can reuse in your projects. I haven’t seen any ready made code yet but I’m sure it can be found somewhere over the internet. (If you have would be great to post that in the comments)
I looked into this problem and what I found was that SharePoint does that job for you and stores it on the form in the JavaScript variable “WPQ2FormCtx”.
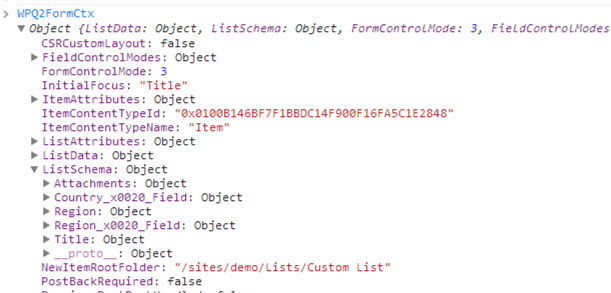
Console output of WPQ2FormCtx Object
This context is somehow new in SharePoint 2013 and Office 365 This somehow represents the so called form context with a lot of information. Also included in this variable is the list schema which we can use without loading any additional information from the list.
So what I did is that I created a small javascript object that loads the information and allow me to generate the id of the field. The tricky part i currently not have implemented is the type part because this is a little bit tricky and the value changes with the different configurations of the fields. I hope that the following code give you an example how this works.
<script>
/* Handles the field of the form */
var fieldDefinitions = {
  Fieldname: [], // Stores all the display names of the field
  Fields: [], // Stores the complete field configuration
  // This function formats the list schema for easier acces
  ParseSchema: function(formContext){
  		var schema = formContext.ListSchema;
    	for(var field in schema)
    	{
			this.Fieldname.push(schema[field].Title);
    		this.Fields.push(schema[field]);
    	}
  },
  // Genereate the Fieldname and Field Guid Part
  GetIdByTitle: function(title){
	var index = this.Fieldname.indexOf(title);
	var currentProp = this.Fields[index];
	console.log(currentProp);
	// return the beginnng of the ID in the format
	// FieldName (encoded) + "_" + Guid of Field
	return currentProp.Name + "_" + currentProp.Id;
  }
};

$(document).ready(
    function () {
		// Reformats the form context
		fieldDefinitions.ParseSchema(WPQ2FormCtx);
		// returns the calulated ID of the field
		var fieldID = fieldDefinitions.GetIdByTitle("Region Field");
		// Wildcard request to the field
		// sets the value of the Region Field
		$("input[id^="+fieldID+"]").val("Works");
    }
)
</script>
To this script the last part needs to be added to be 100% sure. Think about the fill in option for example this will start with the same id but I’m sure there will be added a special type.
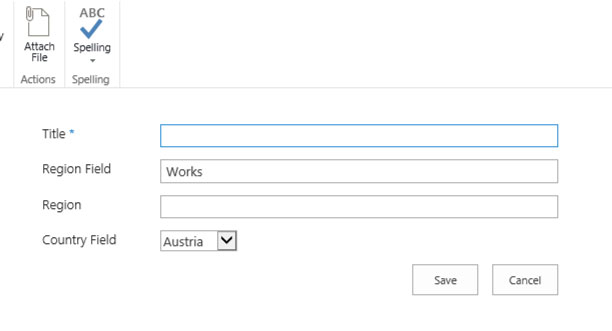
Field after update via JS
As you see the value was written to the form
I will never use the title field again. I write this now 100 times to keep it in mind. But not here in this blog post. In future I will reuse my little helper object for a simple reason. If Microsoft changes the format of the ID attribute I only need to change it at a central location instead of search and replace all my jQuery / JavaScript code.
Convenience is not everything better go an extra mile to be safe.
Let’s jump right into the topic how it is possible to pass data to a modal dialog. On first sight it looks like a complex task but after you read this article you will get an overview how it works. In this simple scenario I use a HTML Form web part with a text box and a hyperlink. The value then should be passed to the new form dialog of a custom list called “Cars”.
In general there are two ways to open a modal dialog. The asynchronous and the synchronous way to open a modal dialog, but here I use the synchronous way to keep the code simple.
The setup for this scenario is simple. First I created a custom list named “Cars” and this list has nothing more than the default title field. After that I added a new HTML Form Web Part to the landing page of my demo site. Then I added a simple form to the web part. It consists of a textbox with the id “newcar” and a hyperlink with the id “create” to create a new entry. This form also loads JQuery from the CDN and the custom script that is needed to pass the value of the input field to the modal dialog.
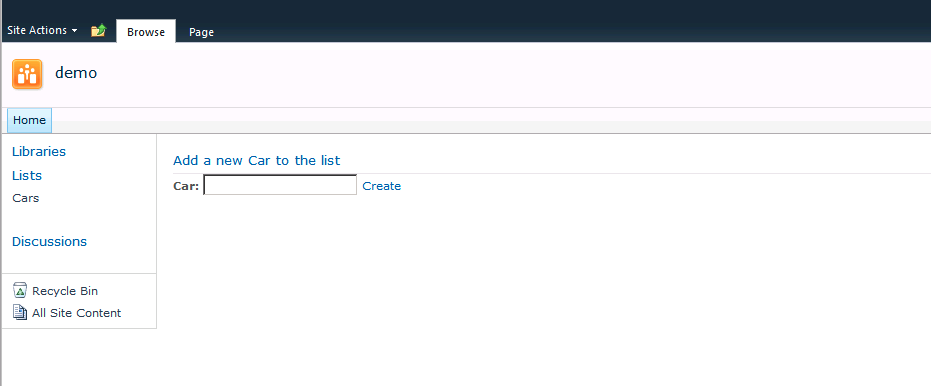
HTML Form web part that should pass the values to the modal dialog
The code of the form looks like this:
<script src="http://code.jquery.com/jquery-1.9.1.min.js"></script>
<div>
    <b>
    Car:
    </b>
    <input type="text" id="newcar" value="" />
    <a href="/sites/demo/Lists/Cars/NewForm.aspx" id="create">
        Create
    </a>
</div>
First the click event on the hyperlink needs to be registered to open a modal dialog. Then the data from the textbox needs to be passed to the title field of the modal dialog.
var childDialog = null;

$(document).ready(function(){

    // register event handler to open the modal dialog
    $("#create").on("click", OpenNewFormInDialog);

});

var OpenNewFormInDialog = function(e){
    // Disabling the default hyperlink behavior
    e.preventDefault();

    // Get the form url from the link
    var formUrl = $(this).attr("href");

    // Setting the option of the modal dialog
    var options = {
        title: "New Car",
        url: formUrl
    };

    // Open the new dialog
    SP.UI.ModalDialog.showModalDialog(options);

}
So far so good this all no rocket science but how do we get the data to the form? Therefor a little trick is needed. The function “SP.UI.ModalDialog.get_childDialog()” will return the last loaded modal dialog. The modal dialog object returned by this function has a special property named $c_0. Once the dialog has been loaded it contains the content of the modal dialog. All that needs to be done is to recheck this property during the loading of the dialog. This can be accomplished with a simple recursive call that pauses for 100 milliseconds, in my case, and check the property again. If this is set then the loading has been completed.
...

    // Open the new dialog
    SP.UI.ModalDialog.showModalDialog(options);

    // Get the child dialog
    childDialog = SP.UI.ModalDialog.get_childDialog();

    // Check the loading state
    CheckDialogState();

}

var CheckDialogState = function(){

    // check if dialog is fully loaded
    if (childDialog.$c_0 != undefined || childDialog.$c_0 != null)
    {
        // get title value from textbox
        var titleValue = $("#newcar").val();

        // load document from modal dialog into a jquery object;
        var dialogContent = $(childDialog.$c_0);

        // find title field in dialog by it's title value
        var titleInputField = dialogContent.find("[title=Title]");

        // setting the title field
        titleInputField.val(titleValue);

    }
    else
    {
        // Wait for 100ms and then check again
        window.setTimeout("CheckDialogState();", 100);
    }

}
...
After the content has been loaded all that needs to be done is to parse the property to a JQuery object. Once it is accessible in JQuery the value of the form web part input field can be added to the title field of the new form. The result can be seen in the following screenshot.
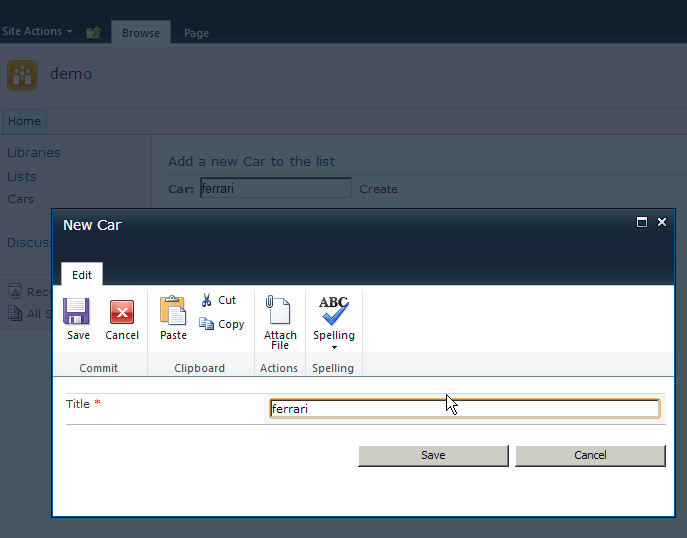
Modal dialog after the values have been passed to the modal dialog
A nice additional feature when data will be passed to a modal dialog is to tell the user to check the values. This can be done using the page status bar for example. The problem here is that the status bar cannot be enabled with the SharePoint function SP.UI.Status.addStatus.
Previously we already loaded the content to a JQuery object, so we can do further manipulation of the output of the modal dialog. SharePoint renders on default a placeholder for that page status with the id “#pageStatusBar”. The code to show the page status looks like this:
...
        // add message to page status bar and toggle the display to be shown
        dialogContent.find("#pageStatusBar").html("<strong>Please check the value</strong>")
        dialogContent.find("#pageStatusBar").toggleClass("s4-status-s2").css("display", "block");

        // resize the modal dialog.
        childDialog.autoSize();
...
At the end I forced the modal dialog to resize itself to avoid possible scrollbars.
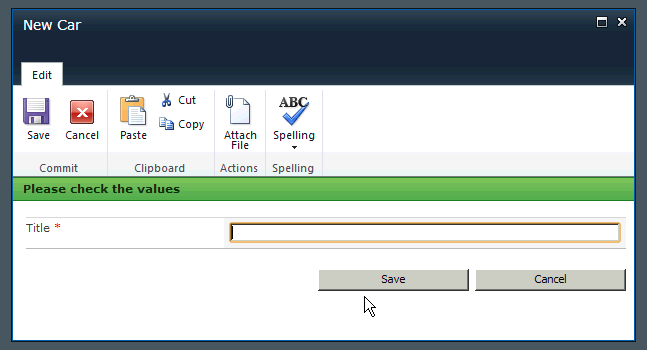
Modal dialog with page status
If you have any suggestions or question please feel free to provide some feedback. As always you can download the html form web part in the link below.
Download the web part: Modal dialog part 1
Please make sure to change the path of the new form