Mark Anderson published today an article on his blog concerning an issue that currently exists in Office 365 and is called “Office 365 Update Changes ‘Display Name’ on Required Fields”. In this article he described that the rendering of fields recently have been changed in Office 365. I will take a look what can be done to solve this probably.
The cause of the problem
The title attribute of list fields have been widely use to customise forms in SharePoint using JavaScript, JQuery or SPServices. I used this attribute sometimes too do address fields by the display name. But somehow I always had a bad feeling about this. Why? Well, the ID attribute of the field is the only real unique identifier in the form. The downside using the ID is that you need to have some information about the field to generate the ID. But I will explain this later.
What the update recently in Office 365 did was to change the rendering of the field. Previously it look like this:
<select id="Region_59566f6f-1c3b-4efb-9b7b-6dbc35fe3b0a_$LookupField" title="Region">
Now it has changed to this:
<select id="Region_59566f6f-1c3b-4efb-9b7b-6dbc35fe3b0a_$LookupField" title="Region Required Field">
As you see now the title has additional parts such as required or field. This means that you haven’t in this attribute the display name of the field alone and you will fail if you query by title.
Safer approach to request fields
As mentioned before the ID property is the only one that is unique in the whole page. The ID is formatted in the following form:
Field name + ”_” + Guid of the field + ”_$” + Type of the field.
As seen in the previous section the ID looks like this:
Region_59566f6f-1c3b-4efb-9b7b-6dbc35fe3b0a_$LookupField
So if you like to be absolutely sure and like to generate this ID by yourself you need to do a request to the list and read the fields. The you will be able to find the name by the display name, the id and the type. This will make some lines of code that you can reuse in your projects. I haven’t seen any ready made code yet but I’m sure it can be found somewhere over the internet. (If you have would be great to post that in the comments)
I looked into this problem and what I found was that SharePoint does that job for you and stores it on the form in the JavaScript variable “WPQ2FormCtx”.
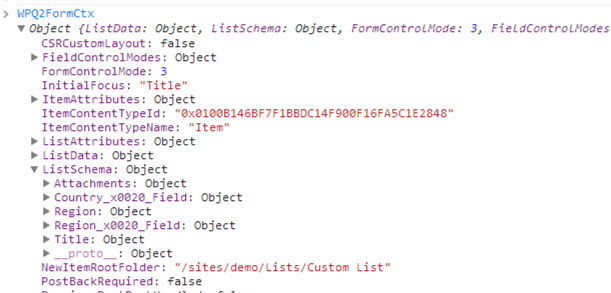
Console output of WPQ2FormCtx Object
This context is somehow new in SharePoint 2013 and Office 365 This somehow represents the so called form context with a lot of information. Also included in this variable is the list schema which we can use without loading any additional information from the list.
So what I did is that I created a small javascript object that loads the information and allow me to generate the id of the field. The tricky part i currently not have implemented is the type part because this is a little bit tricky and the value changes with the different configurations of the fields. I hope that the following code give you an example how this works.
<script>
/* Handles the field of the form */
var fieldDefinitions = {
  Fieldname: [], // Stores all the display names of the field
  Fields: [], // Stores the complete field configuration
  // This function formats the list schema for easier acces
  ParseSchema: function(formContext){
  		var schema = formContext.ListSchema;
    	for(var field in schema)
    	{
			this.Fieldname.push(schema[field].Title);
    		this.Fields.push(schema[field]);
    	}
  },
  // Genereate the Fieldname and Field Guid Part
  GetIdByTitle: function(title){
	var index = this.Fieldname.indexOf(title);
	var currentProp = this.Fields[index];
	console.log(currentProp);
	// return the beginnng of the ID in the format
	// FieldName (encoded) + "_" + Guid of Field
	return currentProp.Name + "_" + currentProp.Id;
  }
};

$(document).ready(
    function () {
		// Reformats the form context
		fieldDefinitions.ParseSchema(WPQ2FormCtx);
		// returns the calulated ID of the field
		var fieldID = fieldDefinitions.GetIdByTitle("Region Field");
		// Wildcard request to the field
		// sets the value of the Region Field
		$("input[id^="+fieldID+"]").val("Works");
    }
)
</script>
To this script the last part needs to be added to be 100% sure. Think about the fill in option for example this will start with the same id but I’m sure there will be added a special type.
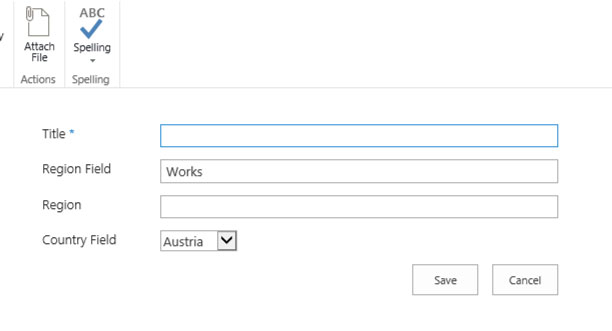
Field after update via JS
As you see the value was written to the form
A Look to the future
I will never use the title field again. I write this now 100 times to keep it in mind. But not here in this blog post. In future I will reuse my little helper object for a simple reason. If Microsoft changes the format of the ID attribute I only need to change it at a central location instead of search and replace all my jQuery / JavaScript code.
Convenience is not everything better go an extra mile to be safe.