Article
0 comment

Tips & Tricks: Add attachments to list items faster

The great thing about SharePoint is that you can accomplish a goal in many ways. In my case the first version was SharePoint 2003 and I’m used to add attachments always from the edit form.
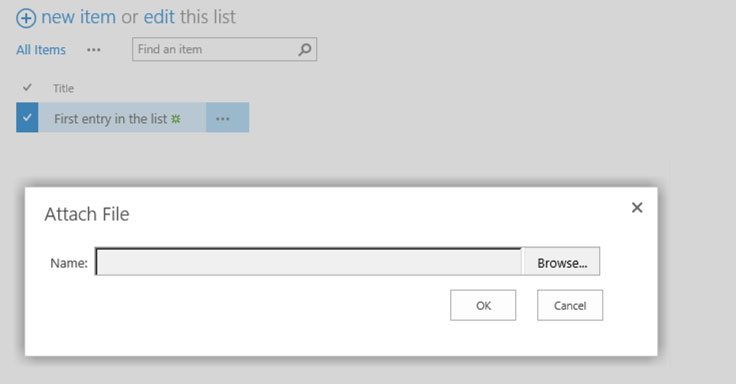
Recently, while I was working on a solution that works with attachments of list items, I accidentally discovered a faster way to add attachments to a list item. This option is hidden in the ribbon and allows to add attachments directly from the list view.

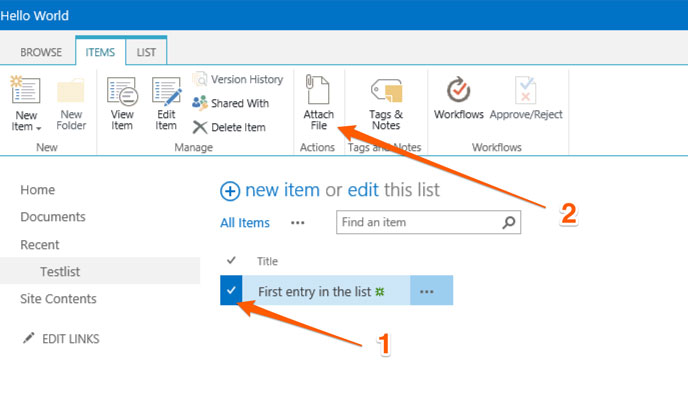
1. Select item 2. Attach file

1. Select item
2. Attach file

First select any item from the list and then the ribbon button. After you clicked the button the upload dialog opens and an attachment can be added to that specific item.

upload attachment

upload attachment

This saves time especially if files need to be added to multiple files. Sadly the upload dialog doesn’t support multiple file upload via drag and drop. This works in SharePoint 2010 as well as in SharePoint 2013

The lesson I learned. Review your personal and trained workflows, how you do something. There is might a better way to do something.


Article
3 comments

Disable “SharePoint plugin cannot be loaded” on public facing web sites

Recently I stumbled upon various sites that are built on SharePoint 2013. All those sites have the same problem. The SharePoint plugin that those web sites try to load is only useful for collaboration but not for public facing web sites.

Plugin request in Safai

Safari and SharePoint on MacOS X

Plugin Cannot be loaded in Chrome

Chrome requests for plugin

Origin of the message

This message comes from a client side JavaScript and tries to load the presence information. To avoid this message the following lines of code needs to be added to the master page or via a JavaScript file.

function ProcessImn() {}
function ProcessImnMarkers() {}

The code to request the plugin won’t be executed anymore. The visitor can enjoy the web site instead of concentration on the source of the error message.

Using SharePoint from MacOSX? Use Safari. This is because if Office and Lync are installed on MacOS special web extensions will be installed to support working with SharePoint better.

Additional information:

Article
68 comments

Build a flexible mega drop down navigation for SharePoint

I’ve read a lot of good articles about mega menus or mega drop in the past. They all were from a technical point of view correct and useful introduction about the basics behind. When it comes to SharePoint you should always consider the user and how they can administer or change the design on their own. This is one of the strengths in SharePoint and the user should always be in the center of every solution. For a mega menu it doesn’t take much to accomplish. This can be done easily in SharePoint Designer or Visual Studio. Choose your weapon of choice and spend 30 Minutes to build up a simple but powerful mega menu.

The ingredients and how they work together

In general a mega menu is nothing more than an HTML Snippet that will be loaded when a user hover over a navigation item. This can be the top navigation or in SharePoint terms the quick launch navigation. For embedding to the quick launch the code only needs to be slightly changed.

The base of the mega menu is a customized article page that has a web part zone for the drop down content. The navigation is the out of the box navigation that should be extended for the following tasks

  • Hover over a navigation item
  • Grab the link URL
  • Load the linked page
  • Cut out the required web part zone
  • Add it to the page as the content of the mega drop down

To accomplish those tasks the well-known JavaScript library Jquery will be used.

The article page

In general to define the content of the mega menu any mega menu can be used as a starting point. The only thing that needs to be done is to encapsulate any web part zone into a <div> element.
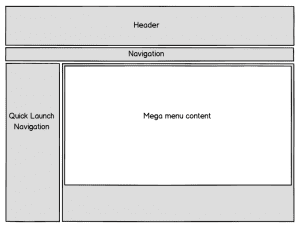
Mockup Mega Drop Down Article Page

Mockup Mega Drop Down Article Page

The code for this is simple and looks like this:

...
<ContentTemplate>
 <div class="article article-right">
 <PublishingWebControls:EditModePanel runat="server" CssClass="edit-mode-panel">
 <SharePointWebControls:TextField runat="server" FieldName="Title"/>
 </PublishingWebControls:EditModePanel>
 <div class="n8d-dropdown" id="megadropdownitem">
 <WebPartPages:WebPartZone runat="server" AllowPersonalization="false" ID="TopZone" FrameType="None" Title="<%$Resources:cms,WebPartZoneTitle_Top%>" Orientation="Vertical" />
 </div>
</ContentTemplate>
...


The script that performs the mega menu magic will simply grab the defined <div> element with all the content in it and adds it to the navigation. Then the author will be able to add content to their demand or change existing content without any single line of code. The only thing that needs to be defined is styled to show the content in a proper way.

The master page

The second thing that is required for this solution is a master page. This is only needed to register the required styles and Jquery scripts. In the default configuration of the master page SharePoint already have a fly out navigation.

....
 <script src="http://ajax.aspnetcdn.com/ajax/jQuery/jquery-1.8.2.min.js" type="text/javascript"></script>
 <script src="/_layouts/n8d.MegaMenu/MegaMenu.js" type="text/javascript"></script>
 <link type="text/css" href='/_layouts/n8d.MegaMenu/MegaDropDown.css' rel="stylesheet" />
...

To avoid possible conflicts with the script, the navigation control needs to be modified. This can be done by changing the properties for the MaximumDynamicDisplayLevels. It needs to be set from the default value which is 1 and needs to be set 0. This means that no dynamic children will be rendered.

...
<asp:ContentPlaceHolder id="PlaceHolderHorizontalNav" runat="server">
 <SharePoint:AspMenu
 ID="TopNavigationMenuV4"
 Runat="server"
 EnableViewState="false"
 DataSourceID="topSiteMap"
 AccessKey="<%$Resources:wss,navigation_accesskey%>"
 UseSimpleRendering="true"
 UseSeparateCss="false"
 Orientation="Horizontal"
 StaticDisplayLevels="2"
 MaximumDynamicDisplayLevels="0"
 SkipLinkText=""
 CssClass="s4-tn" />
   <SharePoint:DelegateControl runat="server" ControlId="TopNavigationDataSource" Id="topNavigationDelegate">
     <Template_Controls>
       <asp:SiteMapDataSource
        ShowStartingNode="False"
        SiteMapProvider="SPNavigationProvider"
        id="topSiteMap"
        runat="server"
        StartingNodeUrl="sid:1002"/>
     </Template_Controls>
   </SharePoint:DelegateControl>
</asp:ContentPlaceHolder>
...

Now that the base setup is done it’s time for some JQuery magic.

The Mega Menu Script

As mentioned before the script doesn’t do much. So when the page is loaded JQuery grabs all URL from the top navigation and looks for content that should be added to the navigation. This will be done by inserting a new <div> element directly on every item of the top navigation. This will be done by the following function.

var loadingData = function(){

    var navigationElement = $(this);
    var link = $(this).attr("href");
    var text = $(this).find(".menu-item-text").text();
    $(this).attr("linkname", text);

    $.ajax({
            url: link,
            async: false,
            dataType: "html",
            success: 
                function (data) {
                    content = $(data).find("#megadropdownitem");
                    
                    if(content.html() != undefined){
                        // fix content for calender
                        content.find(".ms-WPBody").each(function () {
                            $(this).removeAttr("webpartid");
                            $(this).removeAttr("class");
                            $(this).removeAttr("id");
                        })
                        newContent = "<div class='mdd-itemcontent'><div class='mdd-innercontent'>"+content.html()+"</div></div>";
                        navigationElement.parent().prepend(newContent);
                    }
                }
    });

}

For the animation of the flyout i simply added a hover binding to all of the navigation items.

$(document).ready(function(){

    var pageMode = $("#MSOSPWebPartManager_DisplayModeName");

    if(pageMode.val() == "Browse"){
        $(".s4-tn li.static a.static").each(loadingData);
        $(".s4-tn li.static").hover(showFlyOut, hideFlyOut);
    }
});

var showFlyOut = function(){
    if($(this).children(".mdd-itemcontent").html() != null){
        $(this).children(".menu-item").toggleClass("hover");
        $(this).children(".mdd-itemcontent").slideDown("fast");
    }
}

var hideFlyOut = function(){
    if($(this).children(".mdd-itemcontent").html() != null){
        $(this).children(".menu-item").toggleClass("hover");
        $(this).children(".mdd-itemcontent").slideUp("fast");
    }
}

The functions showFlyout and hideFlyout will show and hide the mega menu / flyout and also the class of the current selected navigation item will be toggled for a better styling. The last step was to add the design for the menu. After that the mega menu looks like this.
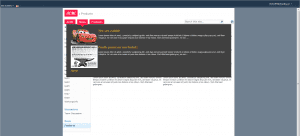
Finished look of the mega drop down

Finished look of the mega drop down

Let me show you how the solution works in the following video.

How to create a mega menu navigation in SharePoint from Stefan Bauer on Vimeo.

As seen in the solution the content of the mega drop down is flexible. Static or dynamic content can be added without changing the core functionality. No server side code is required, which makes it easy to adapt for SharePoint 2013. By changing the style sheets the form of the drop down can be easily adapted. While I used visual studio to deploy my solution this functionality can be added by using SharePoint Designer too. I think the most time consuming task in my mega menu solution are the design adoption but a simple drop down menu can be accomplished in 30 minutes. Would be great if you can share your experience with my solution. Finally what’s left to say have fun in creating you own variations.

Update Nov 19, 2013: Bugfix Calendar Web Part

As David Foster and Scott McLeod pointed out in the comments there is an error when a calendar will be used. The items were delegated to the mega menu instead of the list web part. The solution below is updated and contains the fixed version.

Download Visual Studio Solution
Article
3 comments

Close SharePoint Modal Dialogs with “Esc”-Key press

Whenever a list items will be checked or reviewed in SharePoint a modal dialog come up. This feature of SharePoint 2010 is really helpful from a usability point of view, because the user is able to return to the list where the interaction with the list item has been started by closing the modal dialog. When this will be done a couple of times a day, the user will always have to move the mouse pointer to the close button to close the dialog.

As user learned over the last couple of year, when the user want something to go away that pops out of the current browser window, no matter if it is a modal dialog, image or full screen video the use only have to press the “Esc”-Key to make it go away.

As I mentioned before this is not implemented in SharePoint now, but could be changed with a simple JavaScript and the usage of the Modal Dialog Framework implemented in SharePoint. To add this functionality I created a simple sandbox solution, which has a module and a JavaScript.

First of all the elements.xml contains the following definition:

<?xml version="1.0" encoding="utf-8"?>
xmlns="http://schemas.microsoft.com/sharepoint/">
  <CustomAction
      ScriptSrc="~sitecollection/Style Library/FetchKeyStroke/CloseDialogOnEsc.js"
      Location="ScriptLink"
      Sequence="102"
      ></CustomAction>
  <Module Name="FetchKeyStroke" Url="Style Library">
    <File Path="FetchKeyStroke\CloseDialogOnEsc.js" 
          Url="FetchKeyStroke/CloseDialogOnEsc.js" />
  </Module>
</Elements>

The custom action register a JavaScript on the Master Page. The module definition deploy the JavaScript file the style library, the location for the deployment is URL parameter on the module. The JavaScript file only has few lines of code that capture the ESC-Key press  and close the mos recent dialog. The rest could be found in the following script.

document.onkeypress = function(e) {
    e = window.event || e;

    // Check if ESC-Key is pressed
    if (e.keyCode == 27) {

        // Check if a dialog was recently opened
        var dialog = SP.UI.ModalDialog.get_childDialog();
        if (dialog != null) {
            // Try to close the dialog
            SP.UI.ModalDialog.commonModalDialogClose(SP.UI.DialogResult.cancel,
                "Closed by ESC");
        }
    }
}

Conclusion

With this simple solution I think the usability in SharePoint could be improved a bit and based on SharePoint components like the modal dialog framework. jQuery would be to overweight for this task.

You can download the visual studio solution as well as the sandbox solution.

After the solution deployment a the site collection feature “Close Dialog on Esc-Key press” needs to be activated. In the Style Library the new added JavaScript file needs to be checked in.

Article
3 comments

Deploy Content Type and Document Templates to Office 365 and SharePoint 2010

One of the best concepts in SharePoint are them hierarchical definition of content types that has been first introduces in SharePoint 2007. New content types could be defined by small variations made easily by developer or end users. All document based templates could be assigned with a specific document template that would be used in libraries. If someone has predefined Document Templates that could be assigned with the content type, they could be uploaded or deployed.

Xml Definition of content type with document template

The solution to deploy document templates and content type together in a solution consists of two parts:

  • The content type definition
  • A module for the template file

The first part of this solution is just a xml content type definition with the parent content type set to “Document”. A DocumentTemplate inside the content type definition was specified, which points to the defined template file. The content type looks as follows:

<!-- ContentType: Document (0x0101) -->
<ContentType ID="0x01010064db413f63314bbbb9e4cd59d461beff"
    Name="MyNewContentType"
    Group="Developent Content Type"
    Description="My Content Type"
    Inherits="TRUE"
    Version="0">
    <DocumentTemplate TargetName="MyNewContentTypeTemplate.docx">
    <DocumentTemplate>
    <FieldRefs>
    </FieldRefs>
<ContentType>


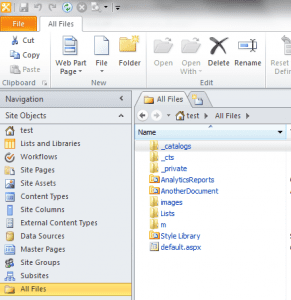
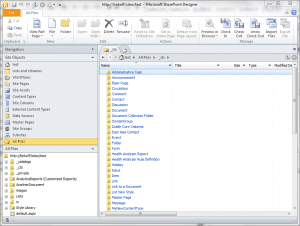
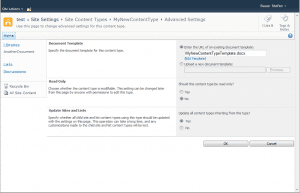
In SharePoint every content type has its own folder where templates will be stored, no matter if the content type is deployed through a solution or a template file has been uploaded via web the browser. These folders are located in the root of the site collection beneath the _cts folder. This folder can be found in the SharePoint Designer. Once the root of the site collection has been opened in SharePoint Designer and on the left side of the navigation “All Files” has been selected the _cts folder gets visible.

SharePoint Designer content type location

SharePoint Designer content type location

SharePoint Designer content type folder

SharePoint Designer content type folder

The second part of the solution is a module that has word document which will be deployed to the folder of the content type.

<Module Name="MyNewContentType">
  <File 
    Path="MyNewContentType\MyNewContentTypeTemplate.docx" 
    Url="_cts/MyNewContentType/MyNewContentTypeTemplate.docx" Type="GhostableInLibrary" />
</Module>

On solution deployment, first of all the content type is created that reference the template file. Later the module will make sure that the template file could be located in the correct content type folder and make the template file accessible.

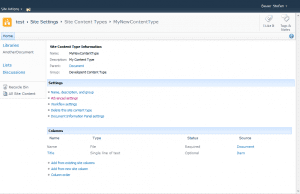
After the deployment the content type and the template can be accessed through SharePoint and used in any desired document library.

Content Type inside SharePoint

Content Type inside SharePoint

Content Type in SharePoint with Template

Content Type in SharePoint with Template

SharePoint Farm Solution, Sandboxed or SharePoint Online aka Office 365

This solution works in all the common deployment scenarios no matter where it should be deployed. This is because no custom code is required.  The complete code for this only uses a couple of lines xml definition and looks like this:

<Elements xmlns="http://schemas.microsoft.com/sharepoint/">
  <!-- Parent ContentType: Document (0x0101) -->
  <ContentType ID="0x01010064db413f63314bbbb9e4cd59d461beff"
               Name="MyNewContentType"
               Group="Developent Content Type"
               Description="My Content Type"
               Inherits="TRUE"
               Version="0">
    <DocumentTemplate TargetName="MyNewContentTypeTemplate.docx">
    </DocumentTemplate>
    <FieldRefs>
    </FieldRefs>
  </ContentType>
  <Module Name="MyNewContentType">
    <File 
      Path="MyNewContentType\MyNewContentTypeTemplate.docx" 
      Url="_cts/MyNewContentType/MyNewContentTypeTemplate.docx" Type="GhostableInLibrary" />
  </Module>
</Elements>

For those who like to try the solution can download the VS Studio Solution or the WSP File.

Article
8 comments

Dynamically display department information for a user in a list

Over the last couple of years a couple of times I heard a request by my customer. Is it possible to show the department information of a user who created an item in lists in a dynamic way? My answer to this was always, that it is not supported and cannot be done. The first time I heard this request was back in the days of Microsoft SharePoint Server 2007. This can only be accomplished by using an event receiver on the list. This will help with the initial filling of the information, but when a name of a department the user is in changes all list item needs to be changed too.

In SharePoint 2010 there is a more confident way than to use an event receiver and the solution is called Dependant Lookup fields. That field can be used for every lookup field.

The Basics

The “Author” or “Created by” field from an end-user perspective is a person field but from a technical point of view it is just a simple lookup field to the so-called “User Information List”. This list in SharePoint is stored in every site collection at root level and has every user provisioned to a site collection. The values, such as, of the “Created by” will be stored in the following format.

1;#spserver\StefanBauer

<ID of item in user information list>;#<user account>

The same way as a normal lookup does. This lookup field behavior of the people field can be used to add another dependent lookup field to a site collection.

Get additional fields for users to the list

In this use case I created lookup for the department information that is stored with every user in the “User Information List”. I wanted to create a dependant lookup field called “Authors Department”. For the deployment of this field I used a simple feature event receiver. The practical reason for this is that dependent lookup fields or cross web lookup fields can be provisioned more easily by using code that the declarative way using xml definitions. The code for this is short and simple.

[code lang=”csharp”]string authorDepartmentCol = web.Fields.AddDependentLookup("Authors Department", web.Fields[SPBuiltInFieldId.Author].Id);
SPFieldLookup authorDepartment = (SPFieldLookup)web.Fields.GetFieldByInternalName(authorDepartmentCol);
authorDepartment.Description = "Can be used to add the department information of an author or created by to a list";
authorDepartment.LookupField = web.Fields[SPBuiltInFieldId.Department].InternalName;
authorDepartment.Update();
web.Update();
[/code]

The field will deploy correctly in the site collection but, and this is the first limitation, the field cannot be found in the site columns. The field is there but somehow SharePoint filter dependant lookup fields out. To use this field it must be added to a site content type or a specific list using code too. In my site collection I created at root level a list called “Author with Department” and the new “Author Department” field will be added to this list. The following code will do that:

[code lang=”csharp”]
SPList list = web.Lists.TryGetList("Author with Department");
if (list != null) {
if (list.Fields.TryGetFieldByStaticName(web.Fields["Authors Department"].StaticName) == null)
{
list.Fields.Add(web.Fields["Authors Department"]);
list.Update();
}
}[/code]

After the deployment of the solution and once it the feature has been activated it is time for a little test run.

The department field in action

The following short video will show the dependant field in action with two different users.

As promised the department information will be added automatically for the different users. There is no other functionality involved or feature event receiver. The department information will be also viewed to users that have only read permission in the portal.

Conclusion

Is it possible to add additional information for a person field to a list? Yes. Is it supported by Microsoft? Maybe. I searched MSDN and haven’t found any reason that this is not supported but I think it needs to be used carefully and wisely. As any other lookup or dependant lookup field can cause impact on the performance of a list this should be planned carefully too.

I think this example for the use of dependant lookups will give a nice outlook how the next SharePoint Server might be enhanced. In the past department information needs to be added manually by every user, which can also cause wrong information. And the information won’t be updated if the user moves to a different department. It also takes longer for the user to enter all required Information.

This use cases for this kind of dependant lookup fields to the “User Information Lists” are nearly endless. This could be used in help desk systems, for task tracking or for the use in a content query web part. The information of the user will be update automatically updated by the profile synchronization.

Download Dynamic Department Field on List VS Solution

Article
18 comments

Centered fixed width design in SharePoint 2010 – The fast way

If you are looking for a way to create a fixed width design in SharePoint 2013 follow the white rabbit.

There are a lot of fixed width master page solutions available on the internet and I read a lot of those solutions. Some of those require JavaScript or don’t respect the ribbon, which means that the ribbon will placed inside the fixed width design. SharePoint is smart enough to handle small screen resolutions by compacting and rearrange the icons in the ribbon, but if a normal user larger screen it gets really hard to administer SharePoint and breaks the usability completely. There is a much quicker and saver ways to create a flexible master page where only certain CSS properties needs to be changed to get any fixed width design as well as centered design with border to the left and right.[Read more]