Article
18 comments

Centered fixed width design in SharePoint 2010 – The fast way

If you are looking for a way to create a fixed width design in SharePoint 2013 follow the white rabbit.

There are a lot of fixed width master page solutions available on the internet and I read a lot of those solutions. Some of those require JavaScript or don’t respect the ribbon, which means that the ribbon will placed inside the fixed width design. SharePoint is smart enough to handle small screen resolutions by compacting and rearrange the icons in the ribbon, but if a normal user larger screen it gets really hard to administer SharePoint and breaks the usability completely. There is a much quicker and saver ways to create a flexible master page where only certain CSS properties needs to be changed to get any fixed width design as well as centered design with border to the left and right.[Read more]

Article
2 comments

Enhance rich text editor using CSS – Part 1

This is the first post in a series about enhancing the rich text editor. The rich text editor in SharePoint 2010 has changed a lot and with some creativity it can be changed and enhanced for a lot of use cases. This first article provides information of a simple addition of a link to the content. It also shows how effects like hover can be handled in the rich text editor. No JavaScript is involved only pure Css. [Read more]

Article
0 comment

A little story about web design and what designer should know about IE9

So this blog post is the result of a funny story happened today. Since the last couple of weeks I daily check out awwwards and css design awards both sites present all the latest and best web designs in the web. Today the site of the day was deep time by Jamie Brightmore (@jaybee). The site is a really great user interface and shows the possibilities in current web design. Deep Time is an interactive info graphic built for the modern web and iPad. It offers a visual way to explore the various stages of the Earth’s history using a 12 hour clock analogy.

I liked the design and so I published it to Facebook. A couple of minutes later I was messaged by a friend that the web site won’t open in IE9. I was not really amused because awwwards and css design awards nominated web sites normally work in all mayor and latest version of browser. I wrote a comment about the deep time web site at awwwards and twittered Jaime Brightmore that I don’t like when site were nominated that don’t support all latest browser versions.

Jaime replied that he have tested it in IE9 and the animation there was quite slow and svg wasn’t loaded correct. The problem Jaime had is one that many people have and especially when they are not using windows every day. It is also easy to solve.

Jaime as a web designer and developer use a make and made the testing in a VmWare and used IE9, but not the 32-bit Version he installed and tested it in 64 bit. The 64 Bit Version is not intended to be used to browse the web it is for development purpose the same way it behaves like with Microsoft Office. The intention behind the 64 Bit Versions is to allow developer all around the world to upgrade their add-ons and plugins to 64 Bit.

In Windows the 64 Bit Version of Internet Explorer 9 is not intended to be used for normal web surfing. Eric Law from Microsoft has a Q&A for IE9 64 bit vs. 32 bit which is worth reading. The 32 Bit Version and the 64 Bit Version are both installed on Windows but the 64 Bit version is hidden to normal users with reason.

At the end I told Jaime that I wanted to give it a try on IE9 and test his web site. He sent me a link because he blocked IE Browsers completely because of the poor performance and different false look. The result was that all worked the same way as it worked in Google Chrome or Safari. Not one pixel was different in IE compared to other browsers and the performance was really amazing. All was tested with the 32 bit version of the Microsoft Browser and at the end he removed the blocking of IE9 and changed it to IE8 which somehow makes sense.

Before you develop a new web project consider the following things that you should know:

First of all for testing only use the 32 Bit Version of Internet Explorer. By pressing the F12 key the developer tools will be shown and the Browser Version can be configured to IE9, IE8 and IE7. That switch will render the site natively in the older versions and the tests matches one to one with the older versions.

Change Browser Version to IE7 and IE8

Change Browser Version to IE7 and IE8

The new developer tools are really handy and let fire bug to look old, but still cannot compete to the Safari Developer tools what I like most.

I think Microsoft has done a great job on the new version of Internet Explorer. Internet Explorer is much better than its reputation.

Article
15 comments

Use @font-face in Rich Text Editor of SharePoint 2010

In modern web design many sites use web fonts. Nearly since the beginning of the Internet there were always intentions to bring desktop fonts to the web. Nowadays the support for web typography in modern browser is in really big. Netscape introduced the <font> Tag in 1995 as a first attempt to bring different fonts to the web. Internet Explorer 4 was the first browser as far as I know that allows font embedding back in 1997.

In general some really good articles about web typography can be found on http://www.alistapart.com/topics/design/web-fonts/ which is worth reading to deep dive into web typography.[Read more]

Article
21 comments

Round corner in top navigation

The navigation in SharePoint 2010 has slightly changed and will now be rendered a new way as a list. To use list elements instead of tables is a common practice in web development. The structure of the navigation and therefore the top navigation has some important elements and style sheet classes that allow you to theme the top navigation really easy.

The Basic

The top navigation is a list as mentioned before. Inside a list element is a hyperlink that contains a span element. The source for one element on the top navigation looks like this:

<li class="static">
    <a class="static menu-item" href="/Blank">
        <span class="additional-background">
            <span class="menu-item-text">Blank</span>
        </span>
    </a>
</li>

To get a rounded navigation the background will be attached in this example to the hyperlink and the additional-background class. To reset the navigation add the follow style to your stylesheet.

.s4-tn ul li.static,
.s4-tn ul li.static.selected,
.s4-tn ul li.static a.static,
.s4-tn ul li.static a.static.selected{
    padding: 0px;
    margin: 0px;
    background-color: transparent;
    border: 0px;
    background-image: none;
}

This style removes all paddings, margins and anything else that is not needed.
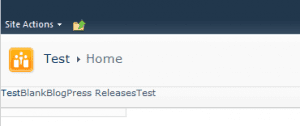
The Background Image

For the background images is use CSS sprite. If you don’t know what this is you can find a really good article on “A list apart”. Basically I us only a single background image and move the background around using background-position property. So the background image is use looks like this:
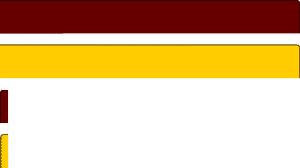
The red area I will use as a navigation background. The yellow will be my hover effects and also mark the selected navigation element but I will tell you later more.

The navigation

In the previous step I removed all margins and padding, which is good because now all navigation elements have now all the same values and set to zero. To attach the background I first stretch the navigation elements back to the values I will use later for the navigation.

.s4-tn ul li.static a.static,
.s4-tn ul li.static a.static.selected{
    background-color: orange;
    padding-left: 10px;
    padding-bottom: 9px;
    margin-right: 5px;
    color: white;
}
.s4-tn ul li.static a.static .additional-background{
    background-color: maroon;
    padding-right: 10px;
    padding-top: 5px;
    padding-bottom: 6px;
    color: white;
}

These styles above will let the top navigation look like this:
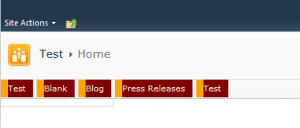
The final Step

Now to get the background image on our navigation you just need to add the background-image property to our style sheet. To get the parts of sprite in the right position we need to add the background-position too. The style sheet look then like this:

.s4-tn ul li.static a.static,
.s4-tn ul li.static a.static.selected{
    background-image: url('/_layouts/navigationtest/navigation-bg.png');
    background-repeat: no-repeat;
    background-position: left -120px;
    padding-left: 10px;
    padding-bottom: 9px;
    margin-right: 5px;
    color: white;
}
.s4-tn ul li.static a.static .additional-background{
    background-image: url('/_layouts/navigationtest/navigation-bg.png');
    background-repeat: no-repeat;
    background-position: right 0px;
    padding-right: 10px;
    padding-top: 5px;
    padding-bottom: 6px;
    color: white;
}

And now you have navigation with round corners then looks like this:
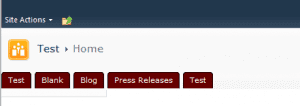
So this wasn’t rocket science so far and only a view line of style sheet mission can be accomplished. One thing left missing, so what about the hover? Even no problem but we need to move the background images. The style for that looks like this and hover is done.

.s4-tn ul li.static a.static:hover,
.s4-tn ul li.static.selected a.static.selected,
.s4-tn ul li.static.selected a.static.selected:hover{
    background-position: left -180px;
    color: black;
}
.s4-tn ul li.static a.static .additional-background:hover,
.s4-tn ul li.static.selected a.static.selected .additional-background{
    background-position: right -60px;
    color: black;
}

And so it should look then:
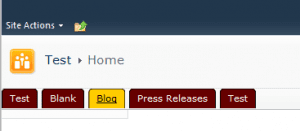
The style above also alters the style of the selected tab and the whole style adaption has only thirty two lines of pure css without any jquery or other code required.

Conclusion:

So in general Microsoft done a great job to get rid of the lame table based design to a completely more web designstandard way. Styling the navigation is one good example how easy some things have become in SharePoint 2010. The classes on the element are better structured and well attached to the elements. Simple hover effects even don’t need any scripting code at all.