Have you ever tried to add a caption to an image inside the SharePoint rich text editor? In this case you might end up editing the source code of the editor. Before you touch the source code of your page, let me show you a more convenient way to achieve this without advanced coding techniques.
Optimise HTML Output of the Rich Text Editor – “-ms-Element” explained
One big prejudice is that SharePoint is not capable to produce clean HTML output via the rich text editor. This was somewhat true with the previous versions of SharePoint. In SharePoint 2013 this has improved and can output all basic text elements without any additional style sheet classes.
How is this possible? By using the magic “-ms-element” attribute.
Element behaviour in the past
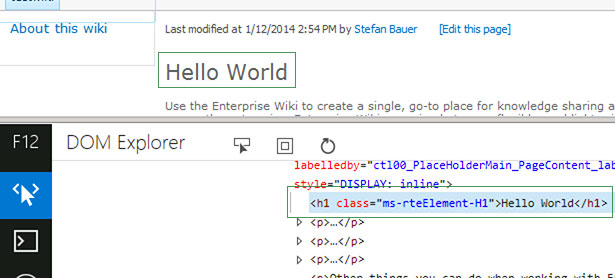
To explain how this works in the current version we need to take a look back to the rich text editor definitions of SharePoint 2010. To show I picked out the style definition for the “Header 1” element. This will be rendered as <h1 class=“ms-rteElement-H1”> .
The definition in the “corev4.css” goes like this:
H1.ms-rteElement-H1
{
    -ms-name:"Heading 1";
}
.ms-rteElement-H1
{
    font-size:2em;
    font-weight:normal;
}
The first definition is not a visible style. It is more an indication for the rich text editor that there exists a style definition for an H1 element. The label for the drop down is defined by the “-ms-name” attribute, a Microsoft specific vendor prefix. The H1 prior the classname defines the element that should be rendered.
The second style definition contains then the style that should be applied to the H1 element.
This worked perfect, but every single paragraph, list and headline had those classes assigned. Due this classes the file size increases.
Something to worry about? Let’s take a look how the browser handle those styles and tags.
Rendering in the browser
The most important style sheet files is the “corev4.css” in SharePoint 2010 and the “core15.css” in SharePoint 2013. Both files are huge and have a lot of design information. How will those files rendered by the browser internally?
The browsers follow a clear logic how they render all the elements and style definitions.
- Parse all tag styles (eg. H1, H2, P,…)
- Parse all class style definitions (eg. .ms-rteElement-H1)
- Parse all ID style definitions
“This hierarchy is the reason why sometimes ‘!important’ needs to be used because a style definition of a class gets overruled by an ID definition.”
This parsing goes all through the DOM and requires some time. Once the style is known by the browser the rendering commands will be sent to the render engine and the content gets displayed. To optimise the overall output performance, we just want to have clear HTML element with easy to identify the styles of those.
This is not so important for desktop browsers, but think about mobile devices and the bandwidth you have there. The structure of the HTML and the CSS have direct impact on the user experience, especially on older devices.
Optimise the HTML output using -ms-element
In the style sheets of SharePoint 2013 in some places a mystical new vendor prefixed attribute have been introduced. Mystical because there is a big lack of official information on this.
I research this behaviour. From my experience this attribute is responsible to render only the HTML tags instead of output it the old fashioned way like it was in SharePoint 2010. To explain how this works, let’s use the definition of the “Header 1” once again. First, we take a look at the code that can be found on various places in the “core15.css”.
/* Style 1: General definition of H1 */
h1, .ms-h1
{
	/* [ReplaceFont(themeFont:"large-heading")] */
	font-family:"Segoe UI Light","Segoe UI","Segoe",Tahoma,Helvetica,Arial,sans-serif;
	font-size:2.3em;
	/* [ReplaceColor(themeColor:"SubtleBodyText")] */
	color:#777;
	font-weight:200;
}
/* Style 2: HTML Definition to add the style to the drop down */
H1.ms-rteElement-H1
{
	-ms-name:"Heading 1";
	-ms-element:"true";
}
/* Style 3: Output optimisation */
.ms-rtestate-field h1,
h1.ms-rteElement-H1,
{
	line-height:1.4;
	/* [ReplaceColor(themeColor:"ContentAccent1")] */
	color:#0072C6;
}
The first part of the style shows the general definitions of all H1 tags wherever this will be used in the source code (Style 1).
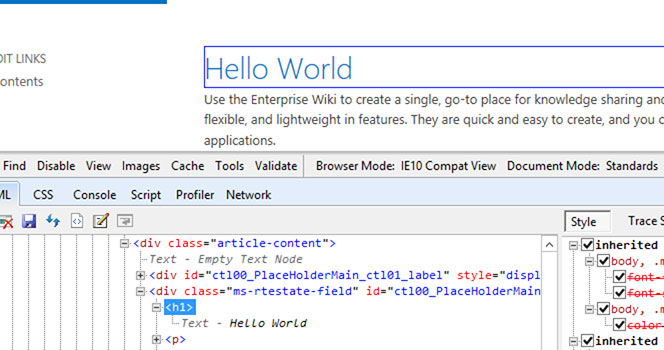
The second definition (Style 2) defines as before that the editor should list “Heading 1” style in the rich text editor drop down and then there is the “-ms-element” attribute. So this means when a user browses the content only the H1 tag is included in source code. All without any additional class on the header.
The most important part is the third because it shows two different definitions. The “.ms-rtestate-field H1” definition is used for the view mode only. “.ms-rtestate-field” is the style sheet class that encapsulates the rich text editor content while H1 identifies the child tag.
The definition for “h1.ms-rteElement-h1” is the same definition as we had in SharePoint 2010 but now it will be only used for the edit mode. You will see this if you take a look at the source code during editing.
Now the content will be rendered differently in display and edit mode. Therefor both definitions are required to display the content correctly.
Summary
As you see now the rich text editor is able to output clean HTML code for all typographic standard elements. Every modern web content management use this. So does SharePoint. The benefit of this is that content migration from other systems is now easier because all that is needed is only plain HTML. Another benefit of this is that it has a positive effect on the SEO ranking of a public facing web site.
Customisation can be done if easily now because all that needs to be define are styles for the standard text element.
Use Syntax Highlighter in SharePoint Rich Text Editor
Love it or hate it, but the rich text editor can be really powerful if you know how to customize. In this article I show you how the well-known SyntaxHighlighter script by Alex Gorbatchev can be added to a wiki page in SharePoint. The idea for this came from a discussion I had with Marc D. Anderson about the Microsoft SharePoint Blog template and how hard it is to format source code in SharePoint in a beautiful way. Well nearly every WordPress blog that provides source code in the posts has a plugin that adds the SyntaxHighlighter to the design. Well here is my integration to SharePoint that consists of the following three components:
- Wiki Page Layout
- Rich Text Editor Style
- Script to embed the SyntaxHighlighter
The wiki page layout
First of all I created a specific wiki page layout to add the functionality of the SyntaxHighlighter. In this page layout I added references to a couple of scripts the SyntaxHighlighter need. I added those inside the content control with the id “PlaceHolderAdditionalPageHead”. This will render the script links to the head section of the master page.
<asp:Content ContentPlaceHolderId="PlaceHolderAdditionalPageHead" runat="server">
	<SharePoint:CssRegistration name="<% $SPUrl:~sitecollection/Style Library/~language/Core Styles/page-layouts-21.css %>" runat="server"/>

	<!-- Basic Style Definition -->
    <SharePoint:CssRegistration name="<% $SPUrl:~sitecollection/Style Library/SyntaxHighlighter/styles/shCoreDefault.css %>" runat="server"/>
    <SharePoint:CssRegistration name="<% $SPUrl:~sitecollection/Style Library/SyntaxHighlighter/SPIntegration/spSyntaxHighlighter.css %>" runat="server"/>

    <!-- Syntax Highlighter and SharePoint Integration -->
	<script type="text/javascript" src="/Style Library/SyntaxHighlighter/scripts/shCore.js"></script>
	<script type="text/javascript" src="/Style Library/SyntaxHighlighter/scripts/shBrushJScript.js"></script>
    <script type="text/javascript" src="http://ajax.aspnetcdn.com/ajax/jQuery/jquery-1.8.2.min.js"></script>
    <script type="text/javascript" src="/Style Library/SyntaxHighlighter/SPIntegration/spSyntaxHighlighter.js"></script>

	<PublishingWebControls:EditModePanel runat="server" id="editmodestyles">
		<!-- Styles for edit mode only-->
		<SharePoint:CssRegistration name="<% $SPUrl:~sitecollection/Style Library/~language/Core Styles/edit-mode-21.css %>"
			After="<% $SPUrl:~sitecollection/Style Library/~language/Core Styles/page-layouts-21.css %>" runat="server"/>
	</PublishingWebControls:EditModePanel>
</asp:Content>
Beside the SyntaxHighlighter I added one style sheet file for the integration to the rich text editor named spSyntaxHighlighter.css and a JavaScript I named spSyntaxHighlighter.js which will be used to render the source code in a proper way and uses JQuery.
Rich Text Editor Styles
To add a format block for the source code I defined for each language a specific rich text editor style. The format block using markup styles looks like this.
pre.ms-rteElement-CodeHTML{
    -ms-name: "Codebox HTML";
    border: 1px black solid;
}
What this markup style definition does is to add the <pre> tag to the content of the wiki page. For each language that should be supported I created an own markup style needs. This is required because it tells the SyntaxHighlighter script how to render the source code properly.
Script to embed the SyntaxHighlighter
As mentioned before I decided to use JQuery to execute the syntax highlighter script. Well the base task of my script is to look for the code blocks defined by the markup styles and then reformat those blocks. For an html code block the output of the rich text editor needs to be converted from:
<pre class="pre.ms-rteElement-CodeHTML">
       <p>Example paragrah in syntaxHighlighter</p>
</pre>
to this
<pre class="brush: js;">
       <p>Example paragrah in syntaxHighlighter</p>
</pre>
The script below will manage this transformation:
$(document).ready(function () {

    $("pre.ms-rteElement-CodeHTML").each(function () {
        addSyntaxStyle($(this), "brush: js");
    });

    SyntaxHighlighter.all();

})

var addSyntaxStyle = function (code, brush) {

    code.removeAttr("class");

    /*** Fixing IE stuff ***/
    var trimedCode = code.html().replace(/<br>/g, "\r\n");
    trimedCode = trimedCode.replace(/<br \/>/g, "\r\n");
    trimedCode = trimedCode.replace(/<BR \/>/g, "\r\n");
    trimedCode = trimedCode.replace(/<BR>/g, "\r\n");
    trimedCode = trimedCode.replace(/<BR\/>/g, "\r\n");
    trimedCode = trimedCode.replace(/<br\/>/g, "\r\n");

    code.html(trimedCode);
    code.replaceWith("<pre class='" + brush + "'>" + trimedCode + "</pre>");

}
For Internet Explorer I need to break the rendering of the source code inside the pre tag. The internet explorer adds additional breaks to the code. Therefore all html breaks needs to be removed and replaced “\r\n”. If those <br> tag won’t be managed the code will be messed up and the result would be only a single line of code instead of a good looking code block.
Usage
Sometimes it can be a little bit tricky to handle the rich text editor in the right way. For code embedding the best result can be achieved if the style block will be defined in the first step and later the code will be added by using the SharePoint functionality “Paste as plain text”. I recorded a simple video to show you how this works.
At the end you should get the following result.
Finally you can download this sandbox solution from Codeplex “n8d.SyntaxHighlighter”.
My integration of the SyntaxHighlighter supports currently the following languages:
- VB, C#
- HTML, XML, XHTML
- JavaScript
- SQL
- PowerShell
Embed everything in SharePoint 2013 Rich Text Editor
One of the new features in the SharePoint rich text editor is that now it is possible to embed external sources like Bing Maps, Vimeo videos, YouTube videos and other resources directly to the HTML content on an article page. In SharePoint 2010 html form web part or other special web parts needs to be used.
How it works
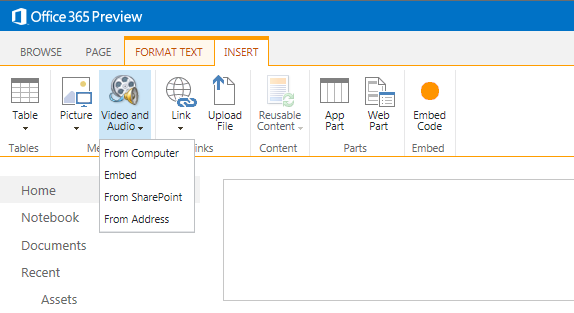
In the ribbon two buttons can be found to access the embedding feature. One can be found in the “Add audio and video” section the other is labeled with “Embed code”, both in the “Insert” group of the ribbon.
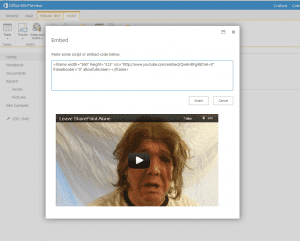
No matter which button will be used for embedding a YouTube, a modal dialog opens where the code for the embedding can be posted. Once the code has been added SharePoint provides a preview of the content that should be embedded.
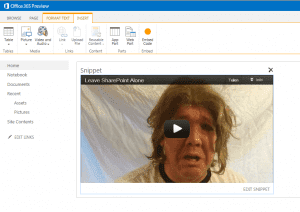
After the submission the source will be added to the rich text editor as a so called “Snippet” that allows the position of the media or change the source of the embedded media.
As you see it’s now really easy to add external source to the content, but can be really embedded everything?
Embed everything or embed only allowed sources
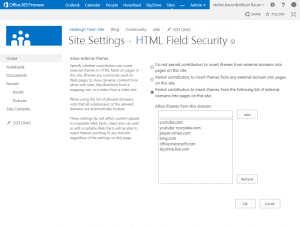
Basically this new feature allows every iframe to be embedded, but allowing any iframe can lead to potentially scripting security problems. The good news here is that the allowed sources can be configured by a site collection administrator. The setting for this can be found in the site settings under site collection administration and is labeled as “HTML Field Security”. This offers the following configuration options:
- Do not permit to add iframe from external external domain
- Permit to add iframe from any external domain
- Permit to add iframes from only the domains below
I think the last option is the most appropriate because it allows to manage what can be embedded. If something is missing from the list can be extended to support only trustful web sources.
Overall I think this is a great new feature for web content management and collaboration portals.
Boxes and positioning – Enhance rich text editor – Part 2
Part one was all about the basics of customizing the rich text editor. This part will show some advanced CSS styling definitions. For a nice looking text layout are boxes handy to position side notes, images, videos or any kind of elements beside the content. The rich text editor has already defined boxes in the markup styles drop down called callouts but they have a fixed position defined. I also will show enhancements for positioning any kind of element.[Read more]
Enhance rich text editor using CSS – Part 1
This is the first post in a series about enhancing the rich text editor. The rich text editor in SharePoint 2010 has changed a lot and with some creativity it can be changed and enhanced for a lot of use cases. This first article provides information of a simple addition of a link to the content. It also shows how effects like hover can be handled in the rich text editor. No JavaScript is involved only pure Css. [Read more]
Use @font-face in Rich Text Editor of SharePoint 2010
In modern web design many sites use web fonts. Nearly since the beginning of the Internet there were always intentions to bring desktop fonts to the web. Nowadays the support for web typography in modern browser is in really big. Netscape introduced the <font> Tag in 1995 as a first attempt to bring different fonts to the web. Internet Explorer 4 was the first browser as far as I know that allows font embedding back in 1997.
In general some really good articles about web typography can be found on http://www.alistapart.com/topics/design/web-fonts/ which is worth reading to deep dive into web typography.[Read more]
